How Can We Help?
Start a mission (beginner mode in 6 steps)
The “start the mission” menu includes a beginner mode (6 steps) and a confirmed mode (3 steps). The confirmed mode allows you to reduce the number of steps before performing a mission.
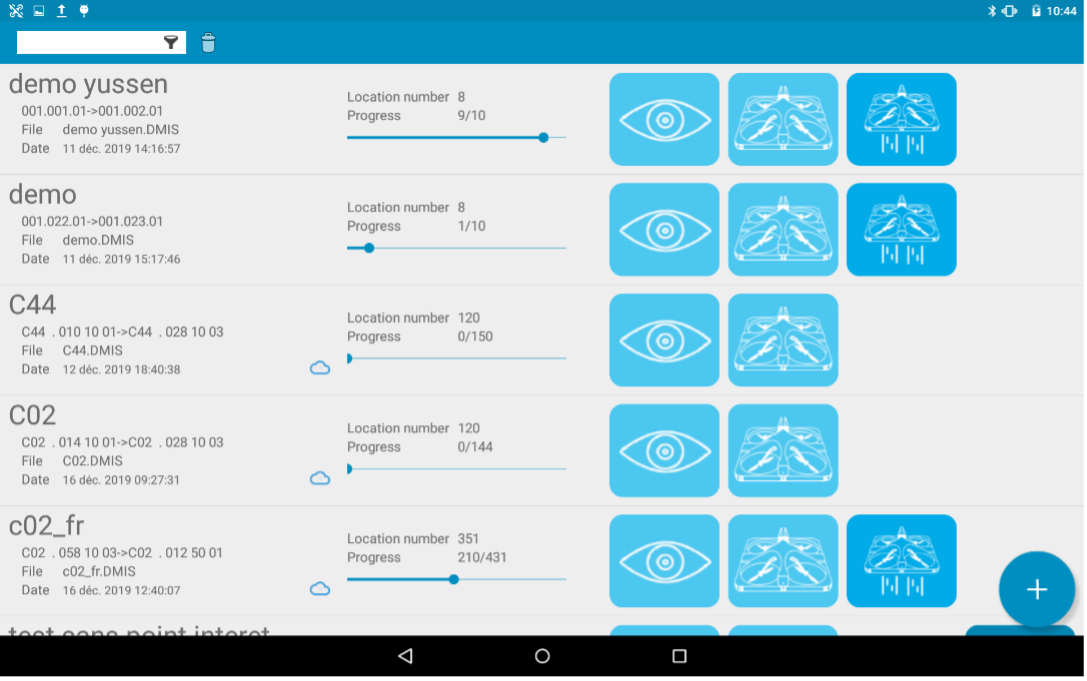
- Mission selection menu, (>Missions)
![]() Start the mission
Start the mission
- Start the mission in beginner mode, step 1 (>Missions>Start the mission)

![]() Moving to the next step
Moving to the next step
![]() Back to the list of missions
Back to the list of missions
Step 1 of launching a mission or resuming a mission makes it possible to visually control the representation of the mission and/or to recall the elements to be taken in the field.
- Start the mission in beginner mode, step 2 (>Missions>Start the mission>Go to step 2)

Step 2 of launching a mission or resuming a mission, recalls the positioning of the solution (terminals and drone) and indicates the name of the first location of the mission in front of which the drone must be placed approximately 1 meter away from the pallets.
The take-off height of the drone presented on the screen is adjustable and can be modified according to the rack in front of which the drone is located. The recommendation is to set the height corresponding to the height of the boom of the first level.
- Start the mission in beginner mode, step 3 (>Missions>Start the mission>Go to step 3)

Step 3 of launching a mission or resuming the mission, consists in starting the drone by inserting the battery. The drone will automatically perform the checks and proceed to the next step if everything is in order. For example, if the battery for the tablet and/or drone is low, it will not be possible to go to step 4 until the problem is solved (see below for the meaning of the errors).
Explanation table of the error lines in step 3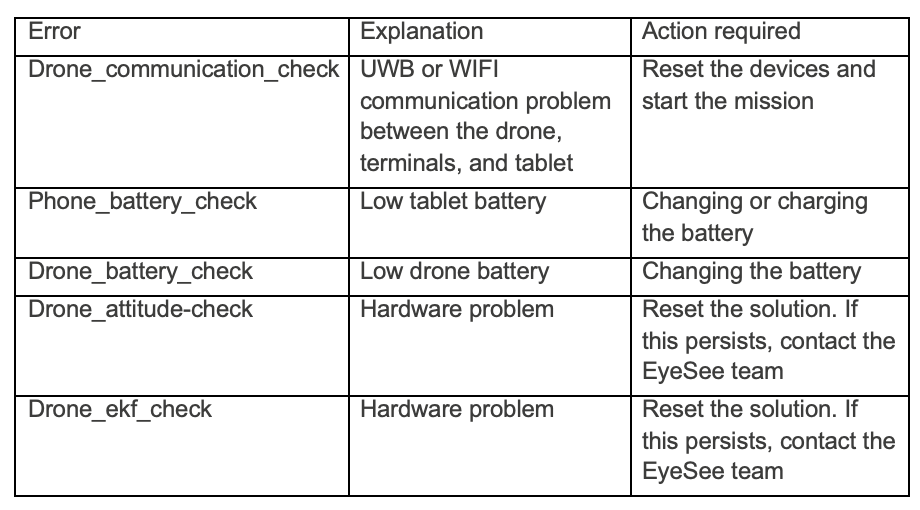
- Start the mission in beginner mode, step 4 (>Missions>Start the mission> Go to step 4)

Step 4 of launching a mission or resuming a mission allows you to choose the position of the beacons in relation to the stickers on the drone.
Select the option according to the layout of your tags.
This allows you to change the drone from the front without having to change the position of the beacons.
- Start the mission in beginner mode, step 5 (>Missions>Start the mission> Go to step 5)

Step 5 of launching a mission or resuming a mission validates whether the operator has the security element(s).
This step can be customized according to the needs of the site (in the application settings).
Check to validate the port of the security element.
Validation of all elements allows to proceed to step 6.
- Start the mission in beginner mode, step 6 (>Missions>Start the mission> Go to step 6)

Step 6 of launching a mission or resuming a mission validates that the operator is at the right safety distance from the drone.
- Start the mission, Take off step, (>Missions>Start the mission>Take off)

![]() Take off
Take off
![]() Emergency stop. Use only if necessary, as a last resort. This option causes the engines to shut down even in flight.
Emergency stop. Use only if necessary, as a last resort. This option causes the engines to shut down even in flight.
![]() This logo on the right will appear to confirm that the engines have stopped. Depending on the height of the drone, stopping the engines can be fatal.
This logo on the right will appear to confirm that the engines have stopped. Depending on the height of the drone, stopping the engines can be fatal.
For the last step of launching a mission or resuming a mission, press the green button for more than 3 seconds to launch the drone until the drone beeps indicating that the takeoff order has been considered.
For safety reasons, for any pressure of less than 3 seconds, the takeoff command will not be given and the indication “Long press” is displayed on the screen.